Mk for gluing a large fragment of a paper napkin. Glue for decoupage - in detail about the important Pasting with paper napkins
This incredibly simple method allows you to glue a whole napkin (or a large fragment) to the decoupage machine without any wrinkles or creases on a flat wooden surface (board, box, bill holder, key holder, magazine holder). The technique is suitable for both experienced craftswomen and the very beginners in decoupage. And it will turn out 100% from the first time. For me, the main thing here is that everything is done easily, pleasantly, and the result is always excellent. The method of gluing is called "HOT".

Would need:
. An iron heated to above medium temperature. Water from it must first be poured out and put on the “Work without steam” mode;
. PVA glue;
. Waxed paper (BAKING PAPER);
. Synthetic brush No. 8 (or No. 16);
. Prepared surface for decoupage (primed-painted over);
. Napkin motif.
WE DO IT TOGETHER!
Step 1
Apply glue liberally to the surface of the prepared workpiece and leave to dry completely. This is approximately 30-40 minutes (depending on the thickness of the adhesive layer). After that, the surface remains non-sticky and smooth.

Step 2
We apply a napkin motif to the workpiece, and with a heated iron (temperature above average), pressing lightly, iron through waxed paper, paying special attention to the edges of the product.

Step 3
Remove the wax paper and admire the beautiful result. As a rule, everything is even, without creases and folds, it is glued the first time. However, pay attention to the edges: they may need to be ironed through the wax paper again.
ONE SIDE
Closer...

OTHER SIDE
And closer

Step 4
If excess napkins remain at the edges, then it is better to remove them by pinching exactly the size of the workpiece after cooling.
Step 5
The completion of the work will give the design of its edge with a contour. It is done with acrylic paint, the tone of which is close or slightly darker than the colors on your napkin. In detail "HOW TO DESIGN THE DECOUPAGE WORK BEAUTIFULLY" watch
You can transform old or ordinary objects into unique ones using various techniques, but one of the most popular and affordable is decoupage. Available materials and tools are used in the work. All you need is “special” is paper or napkins. And about how to master decoupage for beginners, we will tell below. You don't have to buy anything super expensive. Glue, napkins, varnish, brushes, scissors. That's the whole set of necessary tools.
Decoupage for beginners: we collect everything you need
To begin with, briefly about what and with what you have to work. In general, decoupage is fixing on the basis of material or paper with a printed pattern. In order for the pattern to last longer, it is covered with several layers of varnish. Here is a brief description of the decoupage technique.
Decoupage is a technique that allows you to make something special out of ordinary things.
Base
As bases for decoupage, any slightly absorbent base is suitable. What can this technique be applied to? On the following grounds:

As you can see, the list is solid. Only very porous bases with a lot of irregularities are not suitable for decoupage. And so you can decorate everything: from dishes of any kind to furniture and doors (and you can both the surface of the doors itself and glass inserts).
List of tools
Few tools needed:

All of the tools. Unless you still need stationery - a ruler, a pencil, an elastic band.
Consumables
Now let's talk about consumables. We will not talk about napkins and paper here - there is a separate paragraph about them. In addition to them, to make decoupage with your own hands, you will need:

That's all that may be required, so although it requires decoupage for beginners, cash investments, but not very large ones.
Napkins, paper
For decoupage, napkins and printed paper are used. They are glued to the surface, varnished. There are the following types of materials for that type of decor:

In general, special pastes are also used to create three-dimensional images, ordinary photographs from which the bottom layer of paper has been removed and other drawings. But it is not easy to work with them, and this is not decoupage for beginners, but for those who are already developing their skills.
Napkin decoupage: techniques
The main idea of decoupage is to decorate the surface with an image or pattern. The process is creative and there are no concepts of “right” or “wrong”. Surfaces and patterns are different, so different techniques are used. You just have to choose the way that works best for you.

Bottle decoupage is a good start for beginners
The easiest way to start mastering decoupage is by gluing large fragments. When you learn how to glue napkins without wrinkles, you can move on - master the methods of volumetric decoupage or the use of crequelure varnish. In the meantime, let's figure out how to work with large fragments.
Preparatory work
First of all, you need to remember that napkin decoupage for beginners will have to start with the preparation of the base. It should be even, smooth, without pits, cracks, humps (except for those provided specifically). To help - putty and sandpaper. After the surface is leveled, the workpiece is covered with soil (selected according to the type of material) and then covered with white paint.

The stage of applying white paint is mandatory. The fact is that the napkins are very thin, and when glued, they become translucent. If they are pasted on a white surface, the pattern is still bright. If the surface is colored or dark, it fades noticeably, there is no proper effect. Therefore, the paint must be applied even to plastic or ceramics and, possibly, in several layers.
What to do with a napkin
First you need to decide in what form to use a napkin.

How to decide whether to tear a napkin or cut out elements from it? According to the size of the picture. If the fragments are large, have clearly defined boundaries, they are cut out. If the drawing is small, one will be pasted next to the other, they are torn. In this case, it will be easier to match the edges.
Gluing methods
You can choose how to stick napkins for decoupage only by experience. First of all, we decide what exactly we will glue. Can:
- Varnish.
- Special glue.
- PVA - divorced or not.
- Glue stick.
- Egg white.
Gluing on varnish is no worse than glue. But after drying, you can’t do anything anymore - the napkins become almost monolithic with the product. If you don't like something, there will be no chance to change it. Therefore, beginners most often use PVA glue - it is cheaper, it is convenient to work with it.

If you decide to use PVA, you will still have to think (or try) to use it diluted or undiluted. Most often it is diluted with ordinary water in a ratio of 1: 1. When such an adhesive composition is used, one must be prepared for the fact that the napkin soaks from water, can stretch in different directions, and tear from careless movements. Basically, you have to get used to it.

Glue stick is also a good option... if you can get all the bubbles and wrinkles out. This is normal on smooth, slippery surfaces. If the surface is rough, it is much more difficult. It is safe to work with egg white, but it is specific, so if you want, you have to try.
How and where to apply adhesive
Beginners usually choose a small size for their first object for decoupage. In principle, this is not bad. It’s just desirable that the shape be simpler: without a lot of bends.
If the decoration is small, you can use a brush or fingers to apply the glue. With the same "tool" then level the napkin. The brush is used flat or true - to whom it is more convenient. Many people prefer to work with their fingers - you can feel all the folds.

When gluing napkins for decoupage, glue can be applied to an object or a napkin. They do it this way and that. When applied to a napkin, again, there are two techniques:
- Glue is applied evenly to the entire glued piece, applied to the base in the middle. With movements from the middle to the edges, air bubbles are expelled and wrinkles are straightened.
- A certain amount of glue is poured into the middle of the fragment. Further actions are the same: lay on the base, smooth.
In the second technique, it is easier to deal with bubbles and wrinkles - with a large amount of semi-liquid glue, this is easier.

What and how you will do is not important. It is important that there are no wrinkles or bubbles.
You can also do it if you spread the glue on the base: make a small puddle in the place where you are going to glue the fragment, lay it down, and, lifting the edges, drive out the bubbles and smooth out the wrinkles.
Decoupage of a flat surface: glue + iron
When decorating a flat surface, you can do it easier than driving bubbles through the entire napkin. On the primed surface, apply a layer of PVA glue or coat with a glue stick. We smear it well so that “paths” do not form. Let's dry. You can use a hair dryer to speed up the process.

On the dried surface we lay and level the napkin, smooth it with our hands. We put a piece of baking paper on it and with a hot iron from the edge we begin to smooth it.

Decoupage for beginners - maybe try something like this?
Due to the fact that the glue is heated, it impregnates the napkin. Usually it turns out quite evenly. When everything is glued, smear glue on top and let it dry. This is perhaps the easiest way to learn decoupage for beginners.
File + water and glue
Decoupage for beginners using a file for documents (we choose a denser film), water and glue. This method is good if you decorate with large drawings (cut out). Pour a little clean water into the middle of the file, put the cut out fragment into it, face down. We carefully straighten it, expelling bubbles and straightening wrinkles. It's easy in a puddle of water.

When the fragment is straightened, lift the edges of the file and drain the water. The pattern remains adhered to the smooth film. In this state, it is convenient to “try on” and look for the best place for him.
Having found the area where you want to place the decoration, we apply the drawing on the film and begin to smooth it. This is a very difficult moment. It is necessary to ensure that at least one edge of the napkin sticks. After one of the edges of the image has been fixed, gradually smoothing and gradually lifting the edge of the film, we achieve that the napkin remains on the base. If you act gradually, gradually gluing the picture to the base, there will be no bubbles or wrinkles. This method is suitable as decoupage for beginners.

When one edge is stuck, everything is easy
The last stage - we coat the adhered napkin with diluted PVA glue. After it dries, we already apply a protective layer of varnish.
A few secrets
This cannot be called a method of gluing napkins for decoupage. These are little tricks and tricks that can help you deal with creases faster or better.
- Before work, the cut fragments are moistened with water from a spray bottle. The napkin stretches, drying it no longer shrinks. If she has become very warped, she is ironed. Then use as usual. Since the paper is already straightened, it almost does not stretch. Everything goes easier.
- Moisten the fragment with acrylic varnish in the form of an aerosol. In this case, the napkin will become stiff, it does not stretch and does not form folds. But lacquered, it no longer allows glue to pass through, therefore we coat the surface with glue and a treated napkin on it with glue.
- Soak a napkin that is already on the base (dry) and only then coat it with glue. It's hard to explain, watch the video.
We eliminate flaws
If the surface is decorated with small torn fragments, from which it is necessary to obtain a single whole, straighten the edges of the fragments with a brush or fingers. If somewhere there is a heterogeneity of color, we dilute the paint of the desired shade and paint over the translucent base.
When the surface is no longer very wet, but not yet dry, you can draw details with thin brushes and acrylic paints, add brightness and clarity.
The next step is the design of the edges of the product. Here the approaches are different. Somewhere you have to cut the edges evenly, painting over the sidewalls, somewhere you can wrap the napkin on the back side and glue it there. In general, this is also a whole science.

Bringing to the finish look is no less creative process
After that, you can already leave the product to dry. To speed up the process, you can use a hair dryer, but you need to keep it at a considerable distance, move all the time and make sure that it dries evenly. If, after drying, you see that there is a crease on the glued napkin, you can still fix it. We take fine-grained sandpaper, sand it. We act gently so as not to damage the drawing around.
Varnishing
The dried product is covered with water-based acrylic varnish. You can use another, but this one is recognized as the best. First one layer is applied, after it dries, the second. You can stop at this, but if active use is expected (caskets, chairs, etc.), there can be more layers of varnish - three or four.
Photo of decoupage products
Learning the technique is not bad, but without knowing the possibilities, it is difficult to imagine what can be done and what can be expected. A few photos will help you decide what you can or want to do.

Turning an old table into a new and very unusual one is the power of decoupage


Stools are also an art object

This technique is called reverse decoupage - napkins are glued to the glass with the front side
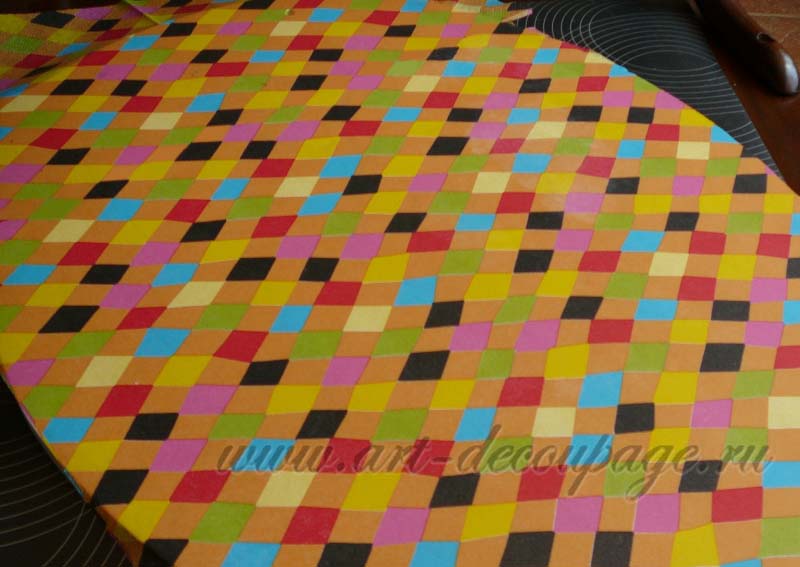
Here I want to tell you about the simplest and most reliable way sticking a large fragment on the surface to be decorated. In this way, you can even stick a whole napkin 33x33 cm, and absolutely evenly, without wrinkles and tears, both on a flat and curved surface.
Consider example of sticking a paper napkin on a flat wooden surface. So:
1. We have a wooden tray blank. We prepared the surface of the tray for decor in advance: we unscrewed the handles, covered it on both sides for porous surfaces, waited for the soil to dry and cleaned the uplifted wood fibers with a fine sandpaper (a mandatory procedure, since the fibers on a wooden surface always “stand on end” after treatment with water-based compounds ). It should be noted that instead of a primer for porous surfaces, which is also called a primer for wooden surfaces, you can just as well use a universal primer.
It is customary to decorate or paint the back of the trays or the bottom of the boxes last. This is the final stage. But this time, in order to quickly publish our master class, I decided to start from the end.
We decided to decorate the back of the tray with a paper napkin. To do this, choose a napkin with a background pattern that suits the style. We have chosen a theme for the decoration of the tray "Harlequin and Columbine". Hence the appropriate choice of napkins.
We also prepared glue for sticking napkins (glue for decoupage with napkins).
2. On the entire surface to be decorated with a napkin, we apply an even layer. I always use the Italian manufacturer Stamperia when using this method of gluing paper napkins. It is quite possible that other adhesives for napkin decoupage could be useful here, but somehow it so happened that I always used this particular glue and it never let me down.
After applying the glue, we check, looking at the surface at an angle, “to the light”, so that there are no areas not smeared with glue.


3. Let the glue dry properly. The longer it dries, the better. The best thing to do is leave work until the next day. But, if time does not endure, then you can use a hairdryer.

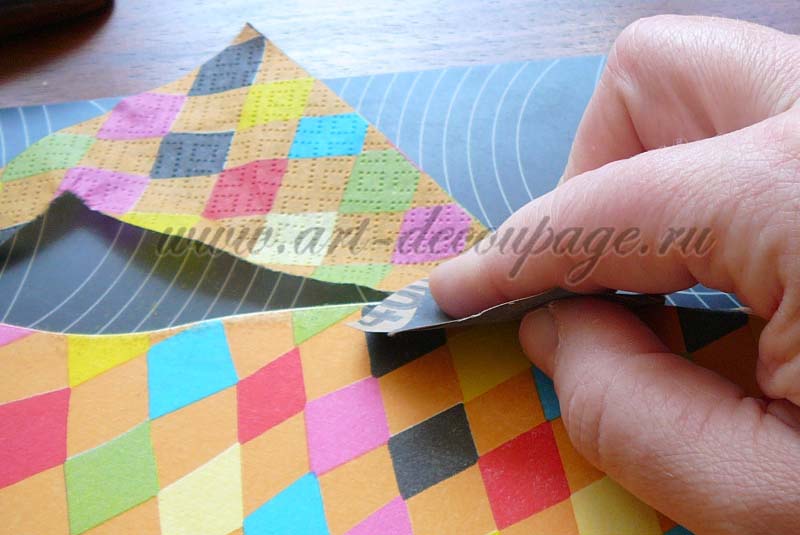
4. For the next stage of work, you will need: parchment paper for baking and an iron.

We spread the napkin on the surface of the tray to see how the decor will look. But, since the surface of the tray is large enough, we need two identical napkins, which will have to be adjusted according to the pattern to each other. We customize the pattern of napkins, cutting off the excess parts. Separate the top colorful layer of napkins from the two lower white layers.

5. First, paste the first napkin. To do this, we apply it “face up” to the side of the tray that was previously covered with glue. We smooth it with our hands, straighten it, put baking paper on top of the napkin of such a size that it completely covers the napkin. Moreover, if one of the sides of the baking paper is smoother, and the other is slightly rough, then we put it on a napkin with the smooth side down.
We set the heating regulator of the iron to the lowest temperature (one division or “synthetics”).
If you have an iron with a steam generator, then first pour out the water from it, because. drops of water falling on a napkin or parchment can cause the napkin to “wrinkle” in this place, and when trying to dry it with an iron- break.

As soon as the iron heats up, we begin to iron our napkin through the baking paper. First, hold it with your hand so that it does not slip. We iron with very strong pressure, periodically holding the iron in one place for a few seconds. When the entire paper napkin is ironed in this way, set the iron aside and wait a few minutes until the ironed surface cools down, since if we immediately start removing the baking paper, then there is a possibility that it may come off with fragments of the napkin. After the surface has cooled, carefully remove the parchment.

6. Now we carefully look at where the napkin did not stick well or where there are still traces of perforation (punctures) along the edges of the napkin. We smooth these places with an iron already without parchment paper, right on the napkin, without holding the iron in one place in order to avoid yellowing of the napkin from overheating. We check whether the napkin is well glued around the perimeter. It is more convenient to smooth small fragments of the napkin with the corner of the iron, slightly tilting it.

Everything, the napkin is glued. Pay attention to how we got a flat and smooth surface.

7. Now we glue the second napkin onto the rest of the tray. Here we can fully appreciate the advantages of this method of sticking paper napkins:
Possibility to fine-tune the pattern
No deformation and stretching when sticking,
Complete absence of wrinkles
The simplicity of the method.
In this way, you can create very interesting collages from napkin fragments.

8. We cut off the edges of the napkin that protrude beyond the edge of the tray by rubbing with slightly fine sandpaper around the perimeter of the tray, where the horizontal surface ends and an angle is formed between the surface and the side wall of the tray. With this method, the excess parts of the napkin are cut off evenly and accurately.

9. After 3-5 minutes, cover the decorated surface with a uniform thin layer over the pasted napkin. At the same time, the surface of the napkin remains absolutely smooth, does not “wrinkle” (as it would be when using PVA glue).

Leave our work to dry completely (at least 2 hours).
10. After that, you can proceed to the finish - varnishing. The number of layers and degree of gloss is up to you, but I would not recommend applying less than 3 layers of varnish. Do not forget to allow the previous layer to dry for at least 2 hours for acrylic varnish and at least 8 hours for solvent-based varnish before applying the next varnish layer.

Decoupage is a special technique for decorating dishes, furniture, interior items, based on drawing a pattern on the surface of an object. This fascinating hobby allows you to create exclusive things with your own hands, opens up unlimited scope for creativity and imagination.
Unlike many other hobbies, decoupage does not require large material costs: all you need for decoupage is scissors, a decorative napkin with a beautiful pattern, varnish and glue.
What glue to use for decoupage
A good decoupage glue should have the following characteristics:
- when dried, it should become colorless;
- the consistency of the adhesive should be medium;
- it should not set very quickly, so that the master has time to carefully apply the napkin and, if necessary, correct its position;
- over time, it should not darken or turn yellow;
- it should not have a sharp unpleasant odor.
Adhesive varnish for decoupage Mod Podge PLAID (USA) fully complies with these requirements. Ideal for decorating hard surfaces. Its original formula combines glue and varnish in one bottle.
It dries quickly enough, forming a transparent water-repellent film upon drying, gives the surface an interesting matte look (the effect of the texture of brush strokes).
Glue is absolutely safe, before drying it is well washed off with warm soapy water. After complete drying (72 hours) it is very resistant to abrasion. A 236 ml package costs about 1000 rubles.
Glue for decoupage Decola (St. Petersburg) based on acrylic, it is designed to work on fabric, it is also suitable for hard surfaces (wood, metal, glass, etc.).
Great for transferring patterns from decoupage napkins to a textile base, after drying it becomes colorless. Full drying time - 12 hours. After that, it is recommended to iron the fabric with an iron on the reverse side through cheesecloth at medium temperature.
Two days after ironing, the product can be washed with soap and cold water. A 50 ml jar costs about 130-150 rubles.
Mordan "La Doratura" Ferrario (Italy). It is used for gluing sheets of gold leaf and potali imitating leaf coatings. Great for decorating glass and other water-repellent surfaces.
The glue dries slowly, which simplifies the work of gilding. The glue is applied with a brush on a clean, fat-free surface, gluing is carried out no earlier than half an hour, when the mordan dries a little. A bottle of Mordan with a volume of 250 ml costs about 1000 rubles. Also available in 75 ml and 1000 ml bottles.
Preparation of a working solution from PVA - how to dilute the glue
Many artisans prefer PVA glue for decoupage, but it is often too thick, then we offer such a way out of this situation.
The process of preparing the working solution is quite simple:
- the right amount of glue is poured into glassware;
- add some clean cold water(for 2 parts of glue - 1 part of water);
- mix with a brush until a homogeneous structure is obtained.
The process of gluing on glue using the example of a napkin
For decoration, special decoupage cards or napkins can be used. Rice paper cards are glued using a well-known application technique: a thin, even layer of glue is applied to the base for decoupage, and an image is applied to the surface to be treated. Drip a little glue and carefully smooth with a sponge or a clean brush from the center to the edges.
It should be borne in mind that rice paper has a different density - from 5 to 25 grams per square meter. The lower the density, the easier it is to level it on the surface and smooth the edges. If the rice paper is very thick, it is better to carefully tear it out of the card, rather than cut it out.
Work with napkins is carried out according to the same technology as with rice cards:
- On the surface prepared in accordance with all the rules, decoupage adhesive varnish is applied in a thin layer,
- Cut or torn parts are applied to the surface.
- The picture is “impregnated” with an adhesive (lacquer) solution from the front side - apply glue varnish with a brush or drip into the center and distribute it over a napkin (the part is smoothed from the center to the edge with a synthetic brush so that there are no air bubbles under it).
- When the glue dries, you can start decorating, painting - smoothing the boundaries of decoupage.
VIDEO INSTRUCTION
DIY recipe
You can also make your own decoupage glue. To do this, gelatin is soaked in glassware for a day to swell (1 part gelatin, 2 parts water), after which it is heated in a water bath to a boil and stirred until the lumps are completely dissolved.
At home, you can also prepare an analogue of Mod Podge glue.
For this you will need:
- one and a half glasses of ordinary flour;
- a quarter cup of sugar;
- a glass of clean cold water;
- a few drops of vegetable oil;
- a few drops of vinegar.
All ingredients are mixed by heating in a water bath. Immediately after cooling, the glue will be ready for use.
FAQ
How long does decoupage glue dry? As a rule, it takes about two hours, but it is recommended to use the product three days after decorating. Some masters use a hair dryer to speed up the process.
Can decoupage glue be substituted? Yes, special glue can be replaced with ordinary PVA, diluted with water in proportions of two to one. You need to dilute a small portion of glue immediately before starting work.
What is the best glue to use? To do this, use brushes of different sizes and hardness, and foam rubber swabs. The arsenal should also include very soft brushes that will not damage the thinnest napkin.
This MK was created to help beginners decoupage.
Thanks to the author of this method, unfortunately I don’t know his name, there is a lot of information on this topic on the net, I just wanted to show how I do it. I hope this information helps those who are looking simple ways pasted images.
DIRECT DECOUPAGE.
We glue a wrinkle-free napkin using a file.
In this case, we have a flat surface, but this method is also great for bottles and vases. How much I ruined the work, gluing in the "usual" way, how many folds and wasted nerves were disguised. Now I'm so lazy that I glue even separate fragments in this way.
For wood; we skin the blank, prime it, paint it with white acrylic paint, no matter what background we want to get. A napkin needs a white color so that it does not get lost. About the choice of paint: at first I bought in art salons and shops for creativity. But since it needs a lot, the most economical option is enamel or acrylic paint for construction work. Sold in construction and household stores.
For glass: soak in hot water, remove labels, if any, wash with dishwashing liquid, degrease the bottle / vase with alcohol or acetone. We paint either with an aerosol spray (we find it in car dealerships, or in the same building ones), or paint on glass (I like the Dekola set of acrylic paints on glass and ceramics from the Nevskaya Palitra manufacturer. You can even find it in stationery in the department for children's creativity. If add a special thinner of the same company to them, they will be transparent.Produced in a set of 6.9 and 12 colors.
Back to the process

We separate the top colorful layer from the napkin, try on the picture. Since it is planned to finish drawing the background, carefully cut off the edges of the napkin making them "torn". You can do it "dry", you can wet, but more on that later

We take a regular paper file, cut off a one-sided oilcloth slightly larger than the size of a napkin from all sides. When the napkin gets wet, it will stretch, and we will need to hold on to something)) Put the napkin on the file with the colorful side down. If you are going to do reverse decoupage, then, accordingly, the fragment will need to be put inside out on the file

We apply PVA glue to the workpiece at the place of gluing the motif

From the spray bottle, we spray just enough on the napkin so that it gets thoroughly wet.

It can be seen that she is pretty old, wrinkles have gone. Gently grab the edges of the napkin with your fingers, straightening it. If it is well wetted, it stretches perfectly; if it is naughty, add water. We put a towel next to it, take both edges and drain the excess water from the file.

We apply it to the surface, adjust it, with a file it is possible to separate the motif several times and stick it again. if the first time you "did not fit in". In this case, we take the file, make sure that the napkin is still on it, carefully re-glue the motif. Well, if everything suits us, we take a cotton pad and begin to gently expel excess air from the middle of the napkin to the edges. Again, three without fanaticism, from the middle in different directions.
On uneven surfaces (for example, bottles), we first apply the middle “roll” in one direction, then in the other.

We hook the corner and carefully remove the film of the file.

Despite the fact that in many MKs it is advised to go over the glue again, I don’t do this, but rather remove excess glue with a cotton pad with blotting movements. After several works after PVA turned pale, after gluing the motive, I take a cotton pad and gently smack it, removing the remnants of water and glue. After drying, we open 3-4 layers of varnish, so the napkin will not go anywhere! Varnish is also needed to protect your work from yourself as you continue your creative process. Well, now we have to finish the background, But that's another story...

P.S. On another magazine, I first pasted a napkin, and then "wet" tore off the edges. If a contrasting or clear fragment is planned? Accordingly, we do not perform these manipulations.


